LeetCommit

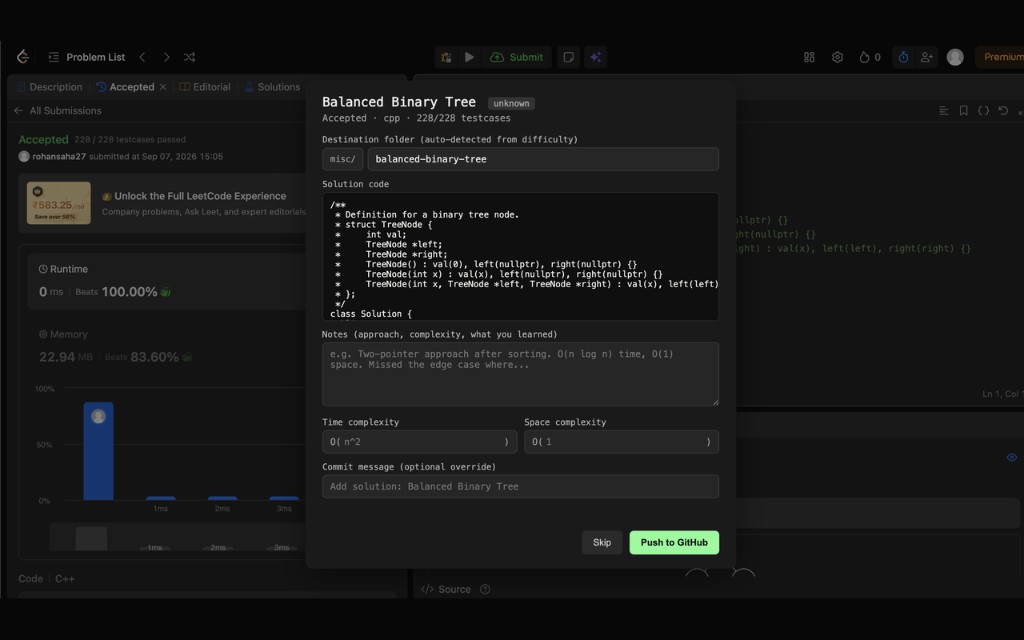
Chrome extension (Manifest V3). Detects an Accepted submission on leetcode.com, shows an in-page modal to add notes, and pushes the solution

Scoped to LeetCode only for v1 (NeetCode dropped for now — see TODO).

Decisions baked into this build

How detection actually works

LeetCode’s result banner is rendered client-side by React with non-stable/hashed class names, so DOM text-scraping for “Accepted” is fragile. Instead, inject.js runs in the page’s MAIN world (declared via "world": "MAIN" in manifest.json, Chrome 111+) and patches fetch / XMLHttpRequest to watch two real network calls LeetCode’s own client makes:

  1. POST /problems/{slug}/submit/ — the request body has your submitted typed_code and lang, and the response has a submission_id. This is where the code comes from — not scraped from the Monaco editor DOM.
  2. GET /submissions/detail/{id}/check/ — LeetCode polls this until state === "SUCCESS". When it resolves with status_code === 10 (Accepted), inject.js dispatches a leetcommit:accepted CustomEvent on window, which content_script.js (isolated world) picks up — event dispatch on the shared DOM is the standard bridge between MAIN and ISOLATED worlds in a MV3 extension.

This means Wrong Answer / Runtime Error / TLE submissions never fire anything, and the code we push is exactly what LeetCode’s judge ran, not a DOM re-read that could race the editor.

Problem title and difficulty are still read from the DOM (there’s no clean API for those without extra endpoints), with a text-content fallback scan (getDifficulty() in content_script.js) rather than a brittle hashed-class selector — if it ever returns “unknown”, the destination folder falls back to misc/ (still fixed, not editable).

Files

LeetCommit/
  manifest.json
  inject.js            # MAIN world: network interception
  content_script.js    # ISOLATED world: modal UI, DOM title/difficulty
  background.js        # service worker: all GitHub API calls
  settings.js           # shared: GitHub App connect (device flow), repo picker, branch
  popup.html/.js        # toolbar popup — full settings + "pending submission" recovery
  options.html           # same settings, as a full page (right-click icon → Options)

No build step — it’s plain JS, loadable as an unpacked extension as-is.

Setup

  1. Create (or pick) a GitHub repo to hold solutions, e.g. leetcode-solutions.
  2. Create a GitHub App (one-time, only needed the first time you set this extension up — if you’re publishing to the Chrome Web Store, do this once and ship the Client ID baked into the published build; users installing from the store never see this step):
    • Go to https://github.com/settings/apps → New GitHub App.
    • Any Application name/Homepage URL works. Uncheck Active under Webhook (no webhook needed).
    • Under Repository permissions, set Contents: Read and write. Leave everything else “No access” — this is the permission users will see and grant on the repo they pick.
    • Under Where can this GitHub App be installed?, choose Any account if you’re distributing this publicly.
    • Under Identifying and authorizing users: enable Device Flow, and uncheck Expire user authorization tokens (keeps tokens long-lived, so there’s no refresh-token flow to build).
    • Save, copy the Client ID shown on the app’s settings page (this is not a secret — the whole point of device flow is that no client secret is needed), and paste it into GITHUB_CLIENT_ID at the top of settings.js.
    • Also copy the app’s slug — the URL-friendly name shown in its “Public page” link (github.com/apps/<slug>) — and paste it into GITHUB_APP_SLUG in settings.js.
  3. Load the extension:
    • Chrome → chrome://extensions
    • Enable “Developer mode” (top right)
    • “Load unpacked” → select the LeetCommit folder
  4. Configure it: click the LeetCommit toolbar icon — every setting lives right there, no separate tab needed. It’s a two-step process:
    • Step 1 — Connect GitHub: opens a GitHub tab with a one-time code confirming it’s you (no token to copy).
    • Step 2 — Select a repository: once step 1 is done, the popup automatically shows a “Select a repository” prompt. Clicking it opens GitHub’s install screen where you pick exactly one repository to grant Contents access to.

    The popup closes as soon as either GitHub tab takes focus — that’s normal. Finish the step on GitHub, then click the toolbar icon again; it picks up right where it left off (Step 2 automatically appears once Step 1 finishes, and the connected repo shows automatically once Step 2 finishes). The Branch dropdown is pre-populated from the repo (its default branch pre-selected) — pick a different one if needed.

    • To switch to a different repo later, click Switch repo (opens GitHub’s own installation settings) — if the app is granted access to more than one repo, a dropdown also appears to pick which one is active without leaving the popup.

Testing it end to end

  1. Go to any easy LeetCode problem, e.g. https://leetcode.com/problems/two-sum/.
  2. Open DevTools console on that tab — you should NOT see any errors from inject.js or content_script.js on page load. (LeetCode requires login to submit, make sure you’re signed in.)
  3. Write a correct solution, hit Submit, wait for LeetCode’s own “Accepted” banner to render.
  4. The LeetCommit modal should appear on top of the page within a second or two of the Accepted result. If it doesn’t:
    • Check the console for a leetcommit:accepted — you can verify the event fired by running window.addEventListener('leetcommit:accepted', e => console.log(e.detail)) in the console before submitting.
    • Check chrome://extensions → LeetCommit → “service worker” link → inspect it → console, for any errors from background.js.
  5. Fill in notes / complexity, confirm the destination folder shown (easy/1-two-sum for that example) looks right, click Push to GitHub.
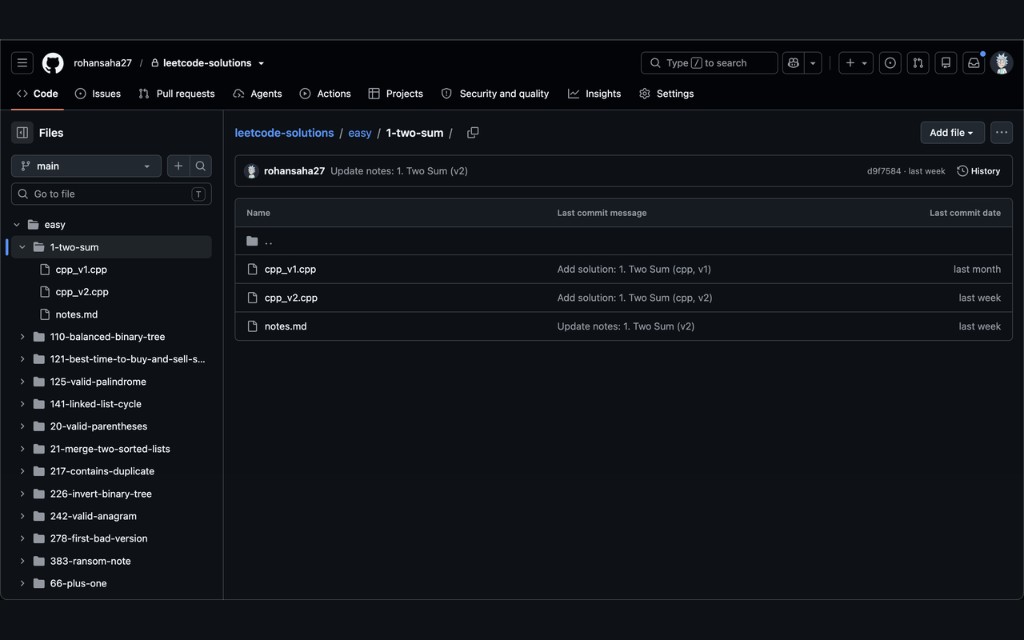
  6. Check your repo — you should see easy/1-two-sum/{language}_v1.{ext} and easy/1-two-sum/notes.md. Open the solution file and confirm the comment header at the top has the pushed date/time, difficulty, and the runtime/memory LeetCode reported.
  7. Test the negative case: submit an intentionally wrong solution (e.g. return []) and confirm no modal appears — this is the “not a runtime/wrong-answer result” requirement.
  8. Test resubmission: submit the same problem Accepted again. Confirm it writes {language}_v2.{ext} (not overwriting v1) and prepends a new dated section to notes.md.
  9. Test multi-language: solve the same problem in a second language, confirm it lands in the same easy/1-two-sum/ folder as {other-language}_v1.{ext}.
  10. Test the skip/recovery path: get an Accepted result, click Skip instead of Push, then open the toolbar popup — it should show the problem under “pending submission” with a Push now button. This still lands in the correct easy/ / medium/ / hard/ folder since the difficulty is captured at detection time, before the modal is even shown.

Known caveats

TODO / not built yet